Showing posts with label Make-Up. Show all posts

Monday, 29 July 2013

Jelly Pong Pong Fairy Lashes Mascara

In May’s Glossybox came a full size mascara from a brand I had never heard of before. I love trying out new mascaras, especially as my eyelashes are so long but not curly at all. The mascara in question is called Fairy Lashes and it comes from the brand Jelly Pong Pong. Although I got this in my Glossybox, it retails at £15 so definitely not a cheap product.

The mascara comes in a wonderful looking light blue box. This is slightly bigger than the mascara itself but quite a lot wider. The front of the box gives the Jelly Pong Pong logo, the name of the product and the website address. The side of the box gives a description of the mascara and instructions on how to use the product. As mascara packaging goes, this is definitely one of the nicer boxes. Some mascaras don’t even come with a box at all so this was a big plus to begin with. If I were to see this on a shelf, it would definitely catch my eye.

Inside the middle of the box sits the mascara which can be pulled out easily. I was expecting this to be a similar colour to the box but instead, it is housed in a lovely, dark purple tube. The tube has the Jelly Pong Pong logo on it as well as the name of the mascara printed in a lighter purple so it contrasts nicely and is easy to see. After unscrewing the lid, I was extremely happy to see a regular application wand. I hate those new plastic applicator wands so my first impressions of this product were great.


However, while the packaging and wand were impressive, not much else was. This mascara has a combination of both blue and black pigments in order to give an intense black colour to your lashes and after application, my lashes were extremely dark. Unfortunately though, my lashes looked terrible. The mascara comes out really thickly after pulling the wand out of the tube and even after wiping some off before applying, my lashes looked extremely clumpy and stuck together. It took me a lot of work with an eyelash brush and a clean mascara wand to fix the mess that this mascara made. Jelly Pong Pong claim that this mascara makes eyelashes thicker and curvier but still keeping them light and soft but I cannot say at all that this is true. My eyelashes were extremely clumpy and heavy and it barely curled them at all.


Even though I wasn’t completely happy with how my eyelashes looked, I still went to work with this mascara on as I just didn’t have time to reapply everything and start over but I couldn’t wait to get it off once I got home. This mascara is also water resistant which makes it an absolute pain to remove. Even by using face wipes, this came off in massive clumps that stuck to my face and were really annoying to get rid of. It took me a good 10-15 minutes to get the mascara off compared to the usual couple of minutes it takes with my normal No. 7 mascara.


With a hefty £15 price tag, this mascara just isn’t worth the money, especially as it doesn’t live up to the claims it makes. 

Friday, 28 June 2013

No. 7 High Shine Lip Gloss and swatch


Seeing as Boots/ No. 7 kept throwing vouchers at me recently, I decided to treat myself to some lip gloss. I’m more a fan of lipsticks really but I wanted to try something different. The No. 7 High Shine Lip Gloss stood out to me as there was a great range of colours on offer. This product costs £8.50 normally although with my £5 off voucher, it only cost me £3.50.

The lip gloss comes in a sleek looking bottle. It is made out of a hard plastic which means it can withstand quite a bit bashing about in a handbag. The bottom half of the tube is mostly clear plastic with the No. 7 logo printed on and the name of the product. The lid is black plastic and twists off to reveal a long handle which has the applicator at the end. The applicator is thick and comes out covered in lip gloss.

The applicator is fairly large and pointed slightly at the tips. I really like the applicator as it has a large enough part to cover the thicker parts of your lips but the pointed tips make it possible to use the applicator as a sort of lip liner.  With this, you are able to outline your lips in the gloss and then fill in the middles which gives a very even application.

This range from No. 7 has a total of 15 shades on offer and I bought Plum Blush, which is a mix between purple and a dark pink. This is very much like the colours of other lipsticks I have from both No. 7 and other make-up brands so I knew I was going to like the colour regardless. You can use this on top of lipsticks and on its own which gives great but different effects as it can make the colour look very different.

The No. 7 High Shine Lip Gloss claims to be collagen boosting, meaning it gives you thicker and fuller looking lips. I am quite happy to say that yes, it does do this. My lips are quite thin and after using this, they did look a lot fuller. This also claims to be moisturising but I haven’t felt the effect of this claim too much.

While this lip gloss looks great on, it doesn’t last very long. Unlike a lipstick, this doesn’t last through eating, drinking, smoking etc. It only took an hour or so for every bit of lip gloss to wear off on my lips and I don’t like having to reapply so often. If this product had lasted longer on my lips, I would have liked it a lot more. I will probably only use this when I know I only need it on for a short amount of time. 

Wednesday, 26 June 2013

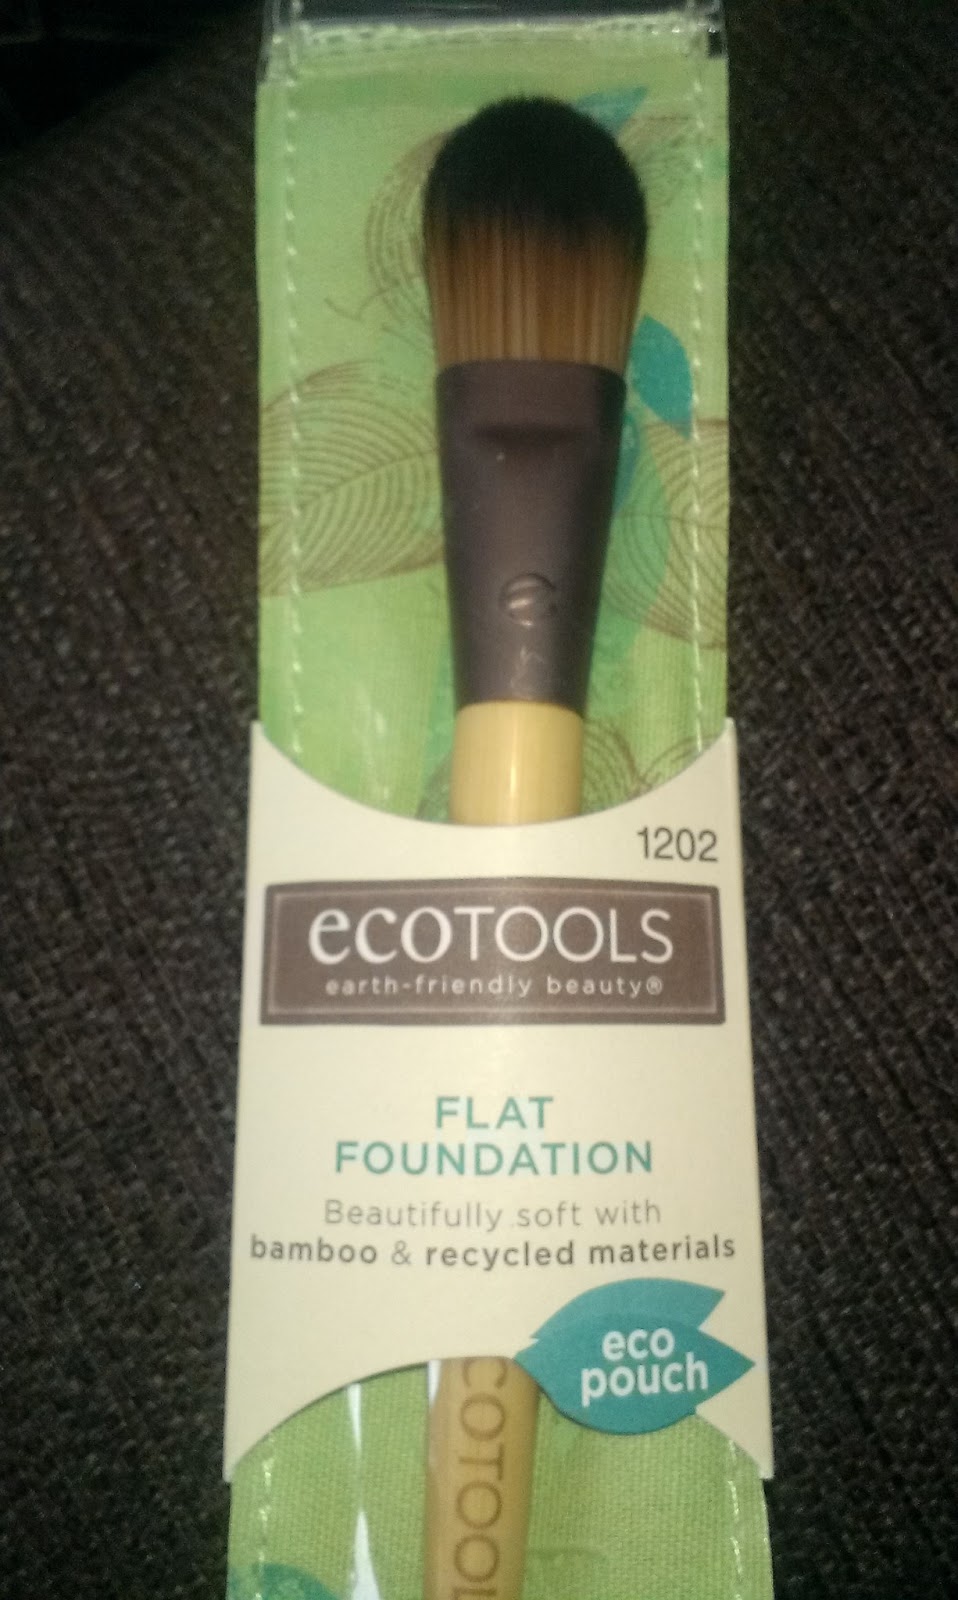
Ecotools Foundation Brush


While I have been really impressed with the foundation brush I have been using from Superdrug, I had to go to Boots for a new one as there was no other options close by at the time. To match the other brushes I bought that day, I got the Ecotools bamboo foundation brush. Like the others, this brush is made from eco-friendly materials which make it better for the environment than other make-up brushes. This particular brush costs £7.99.

The brush comes in a green, eco-friendly package which has a press button at the back to close it. The casing has a plastic front so you are able to see the brush inside and it also has on it the Ecotools logo and the fact that it is made from natural and recycled materials. The pouch is reusable which is a feature I like very much. Foundation brushes especially get clogged up with liquid easily and can get messy when carrying them around.  This packaging means I have somewhere to put my foundation brush when travelling without my make-up bag getting covered in foundation.

The brush itself comes with a handle made from smooth bamboo. Holding the handle is extremely comfortable and it fits well in my hand. The handle is also long enough so make sure you have enough leverage over the angles you can use it at and its ease of use. The long handle makes it possible to angle the brush so you can get right underneath your eyelashes and the corners of your eyes with ease. Above the handle is an aluminium piece which connects the handle to the brush part.

The bristles on the brush are extremely soft but this one is a little smaller than my other foundation brush. However, I like this size much more as it means I can get into smaller parts of my face easier. By using one side of the brush to apply the foundation and the other side to blend it in, this brush helps to create a flawless finish. Obviously, this part also means having a decent foundation too though.

To clean the brush, I tend to use shampoo as I like the bristles to be kept nice and soft. The brush does build up quickly with foundation so it will need cleaning every 1-2 weeks. I like to have a sink full of really hot water and shampoo then let it soak for a while before rubbing the bristles with some more shampoo to get the rest of the foundation out. It doesn’t take long to clean the brush properly but it is a bit of a pain when having to do it so often.

Overall though, this is a great foundation brush and a better one than I had before. 

Monday, 24 June 2013

Sleek i-divine Original Palette and swatches


I have been coveting a Sleek i-divine palette for quite some time now and I decided to treat myself as a finishing university present. I must have stood in Superdrug for ages trying to decide which one I wanted. After a lot of consideration, I decided to go with the Original Palette. Each Sleek i-divine palette can be bought from larger Superdrug stores or online and costs £7.99.

All Sleek palettes comes in (for lack of a better word) a very sleek looking black box. The box is rectangular in shape and has the Sleek logo imprinted into the top of the lid. It is made from a black plastic but is extremely smooth to the touch and both looks and feels nice to hold. Although the box is plain black, and should look quite boring, I don’t think it does at all. For me, the box looks more expensive than what the product cost and while there is nothing fancy or colourful to it, it is a nice box for eye shadows. Obviously, as a cheaper palette, you don’t get all the fancy add ons like you would with something from the big Urban Decay palettes but as this is going to sit in my handbag mostly, I am glad for the simple design.

As you flip the lid open, you can see the 12 wonderful colours of eye shadow, as well as a large mirror on the inside of the lid. In front of the eye shadows, there is a long compartment where a double ended applicator sits. The reason I chose the original palette because the range of colours in this palette were more every day colours compared to some of the others. I wanted something I could use a lot and something I could take on holiday with me later on in the year.


On the top layer (from right to left) you get black, purple, dark blue, light blue, a teal kind of colour and dark green.

On the bottom layer (from right to left) you get a soft gold, light pink, slightly darker pink, brown, copper and a dark olive colour.


The eye shadows are made from a pigment which means the colours not compact like other eye shadows. These come away quite easily once you put a brush or applicator to them. I have used the applicator provided but I prefer to use my own, softer brushes as they tend to give a smoother application. As these are pigmented eye shadows you do need to be careful when putting the brush to the colour. If you press too hard, the colour will break and you’ll end up with a messy box of powder on your hands.

When applying, it is best to start off with a little amount and to build up the desired colour. For instance, the purple could either end up as a soft lilac if you only use a small amount or it could also be a rich violet if you add a couple of layers of colour. I really like the diversity you get in just one palette and also the fact that the colours go really well together. This is a well thought out palette as you can use some of the colours as base colours while using some of the others as highlighters.

As these are pigmented eye shadows, it is highly advisable that you use some form of primer before applying them. Pigments are loose and by using a primer, it makes sure the powder sticks to the eyelid rather than it coming off over the course of the day. I use a Benefit primer underneath my eye shadow and this makes it last the whole day without any creasing whatsoever. Before buying this, I was very loyal to Urban Decay in regards to eye shadows but considering the price difference and colours available, I may now be a Sleek girl through and through.  

Tuesday, 18 June 2013

Boots No. 7 Moisture Drench Lipstick


A while ago, I used to wear lipstick all the time. After the majority of them running out/ me being too tired to care due to work and uni, I stopped wearing lipstick for a while. Now that I have finished university and am looking for a new job, I thought it was about time I put more effort into my appearance like I used to. No. 7 is one of those brands that I know have a fantastic reputation so it was where I headed to buy myself a new lipstick. What I bought was the Boots No. 7 Moisture Drench Lipstick. This lipstick costs £9.50. I chose Romantic Berry as plums/ dark pinks suit me the most.

No. 7 claim that the ‘No7 Moisture Drench Lipstick now has a new and improved formula that nourishes your lips, making it our most moisturising lipstick. It keeps them smooth, soft and full with colour.’

The lipstick comes in a sleek, black plastic tube. The No. 7 logo is carved into the tube revealing a metallic silver colour which contrasts nicely with the black. The tube is extremely plain, with the colour of the lipstick on the underneath along with it stating that this lipstick is SPF 15. Although the lipstick packaging is quite basic, it still looks really nice, especially if you have more than one of these products.

This lipstick applies really well. I don’t use a lip liner and as I bought a semi-dark colour, I was a little worried about it bleeding. However, the lipstick glides on with ease and by using the pointed part of the lipstick, I found that a lip liner was not needed anyway. Not only does this glide on easily, coverage is very even and smooth. Some lipsticks can end up looking darker in places but this one has a very even colour all over which is nice.

While this is not said to be a long lasting lipstick, I find it lasts a good few hours and that’s without using anything like lipcote on the top. I smoke and drink quite a lot throughout the day and this lipstick lasts really well though all of that. On a long day at work, this has lasted me a good 3-4 hours before I needed to reapply. Even then, there were still hints of colour and it just looked a little faded by this point.

This lipstick now stays with me all the time in my handbag and I wear it daily. I’ll definitely be trying more colours from this range at some point. 


Friday, 14 June 2013

Bourjois Liner Feutre


Although I absolutely love my regular pen eyeliner from Collection 2000, it wasn’t available recently so I had to pick something else. I thought I would splash out a bit and see what a more expensive brand was like in comparison. I bought the Bourjois Liner Feutre in black from Boots. The eyeliner cost £6.99 at the time of purchase. Bourjois claimed that this was ‘a soft felt-tip eyeliner for ultra easy application and long lasting effect.’

In regards to packaging, there isn’t any really. The eyeliner doesn’t come in a box or a packet but instead just sits there on the shelf. The outer casing to the pen in black and it has a slight bowed effect to it, with it being slimmer in the middle. The name of the product is printed on the casing in quite large white lettering as well as there being the Bourjois logo there as well. The only liner I have ever seen to come in a box was from MUA so I wasn’t surprised at the lack of packaging with this one.

Using the pen itself is like any other pen liner. After popping off the lid, you will find quite a large sized pen nib. However, the end of the nib thins out quite a bit which would make it possible to create both thick and thin lines, depending on the look you were going for. On first impressions, the nib looked extremely black and I was looking forward to using something quite a bit more expensive than my usual brand of eyeliner.

When it came to using the liner though, I cannot express just how disappointed I was. I began to draw on my eyeliner as I normally would but quickly realised that something was wrong. Barely any colour was coming off the nib and instead of it being really dark, it was a washed out black kind of colour. I purposely picked a pen from the back of the stack, as I always do with make-up but now I am unsure whether or not this had been used as a tester or this is just what the liner is like.

After several attempts to get a thick, dark line on my eye lid, I gave up. I had to remove what liner I did manage to get on my eyelid as there was no way I could make it look good or finished. Also, I didn’t want to have to attempt the other eye as well as the first looked bad enough. When paying £6.99 for a product, especially a pen eyeliner, this should not be happening. Even if this had been used as a tester, it must have been used a hell of a lot for it to get in this state. I’m used to having a pen liner with a lovely flow of the liquid and one which I have had for at least 6 months (with daily use) before it ever getting anywhere near to being in this state.

Due to my terrible first experience with Bourjois Liner Feutre, I will never be buying this product again, nor can I recommend it.

Wednesday, 12 June 2013

Boots Eyelash Curler


My eyelashes are extremely straight and have absolutely no curl or curve to them whatsoever. Using an eyelash curler is part of my every day make-up regime and I cannot live without this product. When I lost my make-up bag, the first item I went to repurchase was an eyelash curler and I ended up with the Boots eyelash curler.

This eyelash curler comes in very simple packaging which consists only of a little plastic bag. This hangs on a hook on the shelves in the shop. The front of the plastic bag is see through with the Boots logo printed on it as well as the name of the product. The back of the bag has the barcode and a little description about the eyelash curler and how to use them. The packaging is far from exciting and I’m sure it could be something nicer like a box maybe.

The eyelash curler itself is made from black metal with two finger holes at the bottom and the curler part at the top. You also get an extra little foam pad with this eyelash curler for when the one already in use gets flattened. This extra pad is attached to the handles of the curler but can easily be removed as it tends to get in the way if you leave it on.

Eyelash curlers are designed for use before using mascara so be sure that your eyelashes are both dry and clean. By opening up the curler with the finger holes, you then proceed to clamp them over your eyelashes, starting right at the roots, for 15-30 seconds. I find 30 seconds is plenty of time to get the desired results. After only the first use, I could tell that I was going to love this product. These eyelash curlers work so much better than my old ones (I can’t remember where they were from though). My eyelashes were curled wonderfully and looked even better once I had mascara on as well.

These eyelash curlers cost £4.50, which I did think was a little expensive considering they’re Boots on brand. However, they work really well and are worth the money to me. 

Monday, 10 June 2013

No. 7 Exquisite Curl Mascara


For so long, I have been using Maybelline mascaras because I know they have the kinds of brushes I like. However, I wanted to try something a little different and a little bit more expensive this time around. I’ve always liked products in the No. 7 range so thought I would try one of these. What I ended up with was the No. 7 Exquisite Curl Mascara. I chose this one in particular because my eyelashes are pretty straight and definitely need some help in the curl department.

The mascara comes in a very girly, metallic pink tube. I absolutely love the colour of the packaging and this is what drew me to look at it in the first place. The text on the packaging is quite simple, stating the No. 7 logo, the name of the mascara and a description which reads; ‘For beautiful curve and volume.’ Some mascara tubes are extremely bright and busy looking depending on the brand you buy so it was nice to see something which was much more simple.

I’m not a fan of these new, strange mascara wands. I like a classic mascara wand which is another reason why I bought this particular product. As you unscrew the lid and pull out the wand, you can see it is a lovely thick wand which is covered in nice, dark mascara. The wand is also curved instead of being straight which is something I would have expected with a curling mascara. A little too much does come out with the wand but this is easily wiped off on the mascara tube.

Applying the mascara is exactly how you would with any other – start at the roots and work outwards. After applying the first coat, I instantly noticed some added curl to my lashes although the volume was not fantastic. With only one coat though, this mascara did separate my lashes really well and there weren’t any clumps whatsoever. After a second coat, my lashes were curled a bit more and there was a lot more volume, which resulted in a look that I liked very much. As I bought the black version (also available in brown), my lashes were also very dark.

This mascara did a pretty good job of doing what it said it would. I also tried using this product with the additional help of eyelash curlers. By using these as well, my eyelashes ended up having fantastic curl to them and great volume. While this product does work well on its own (for people with already curly lashes) I prefer to use it with the eyelash curlers.

The No. 7 Exquisite Curl Mascara costs £11.

Friday, 7 June 2013

Ecotools bamboo powder brush


As part of my new make-up set, I had to get a whole new set of brushes too. With there not being many options at the local Boots branch that I visited, I ended up buying the Ecotools bamboo powder brush, which matched the foundation and blusher brushes I also bought. As I mentioned, I bought my brushes from Boots and they can also be purchased at Boots.com.

The Ecotools bamboo powder brush costs £9.99.

The special selling point of this brush is that it is by Ecotools, a brand which specialise in eco-friendly make-up accessories. Not only does the brush come in a reusable pouch, but the bristles are made from synthetic taklon, the handle made from bamboo and the metal part is made from recycled aluminium. Although these are not my reasons for buying the brush, I think this a great idea for those more concerned with these kinds of things than I am.  

This powder brush feels nice to hold. The bamboo handle is lovely and smooth and just long enough to grip your hand around. Above the handle is the recycled aluminium which holds the handle and the bristles together. This is very smoothly fitted to the handle so it doesn’t stick out at all nor can it scratch your hands while you are holding the brush.

As a user of face pearls for many years, I haven’t really used much pressed powder so therefore, not used a matching brush either. The brush I use for my face pearls is very compact and round, making the bristles quite stiff. However, the powder brush is very different. Instead of having compact bristles, this brush has very soft and loosely fitted bristles. The brush head is also quite wide, meaning you can cover a lot of your face at once without applying too much powder anywhere. As the bristles are super soft, using the brush feels really nice on my face.

As the bristles are quite nicely spread out, this means that you can also easily shake or tap off any excess powder. My powder is a really light colour too so I am able to see it really well on the bristles. I find that because the brush is large in size, I am easily able to cover my face with powder in only two or three sweeping motions. I find using this brush so much easier than the application pad provided with my powder as it doesn’t take nearly as long to use.

Overall, this is a great powder brush and well worth the money.

Tuesday, 4 June 2013

Rimmel Glam Eyes Trio


When I recently re-bought my basic make-up kit, I also threw in an eye shadow which is something I don’t wear every day anymore. However, I was going to the opera and wanted a bit more make up than usual. I also wanted something I could easily carry around with me/ take on holiday in September. While in Boots, I came across the Rimmel Glam Eyes Trio. As this would suggest, you get three eye shadows and they are available in a variety of colours. I went for the one with black, grey and silver though as smoky eyes are always a good look.

As a Rimmel product, this eye shadow trio is available in shops such as Boots and Superdrug and many places online. RRP is £6.49.  

The trio of eye shadows comes in a small, black plastic casing which opens easily as you push up the top lid. Most of the lid is see through although the edges are black. The lid also has the Rimmel London logo printed on in white which is a nice contrast to the black. You can see that inside are three different eye shadows, each of a different size and shape as well as a double ended applicator.

The Rimmel Glam Eyes Trio comes in 7 different shades and I purchased Twilight Zone. Each of the eye shadows feels very soft to the touch when using your fingers. All of the three compartments have a diamond effect carved into the eye shadow which looks really nice. The larger section also has the Rimmel London crown sign carved into it. I think the finish of these eye shadows make them look a lot more expensive than they actually are.

Each of the eye shadow shades in this box are put together to complement each other. While I got black, silver and a dark grey, others have colours such as light blue, navy and a silvery colour. Rimmel make it easy for people to match their colours well and to experiment with the effects of the colour combinations.

These are eye shadows which are very easy to apply. I have to say here that I didn’t use the applicator provided but my own eye shadow brushes. I used the silver in the inside of my eye, the grey in the middle and then smudged the black in the crease of my eye as well as the outer area of my eyelid. This created a wonderful smoky effect once all three colours had been blended in. You can also use each colour separately if you wanted and they would still look really nice.

After wearing the eye shadow for about 5 hours, I did begin to notice it started to crease. However, this was without using a primer and with a primer, it didn’t crease at all. Unfortunately though, not everyone uses primers and without it, this eye shadow set doesn’t really hold up too well. I like the colours well enough but as they don’t work very well without the use of addition products, this makes them not quite as good as they could have been. 

Friday, 31 May 2013

Collection 2000 24hr Extreme Felt Tip Liner


One make-up product that I just cannot live without is the Collection 2000 24hr Extreme Felt Tip Liner. After finding this little treasure a few years ago now, I have hated all over pen style liners that I have tried. Collection 2000 is by no means an expensive make-up brand but they do some fantastic products. Yes, some of them are a bit hit and miss but they do have a few things which are worth a lot more money.

I have this liner in a few different colours but I use the black more than anything else. If you want a more adventurous or colourful look though, you can always try the purple, teal or blue. For me though, black liquid eyeliner is a classic look and you can never go wrong with it really. Also, there are many ways to make this kind of eyeliner look more exciting or make it more subtle if that’s what you want.

The Collection 2000 liner is exactly what it says it is – a felt tip pen. While I have tried proper liquid eyeliners before, I find that using a pen gives more stability when applying to the eyelid as you can get a better grip on the product. When first applying to the eyelid, I notice how rich and black the colour is. As a liner from a cheaper brand, I was expecting it to not look as black or dramatic. However, the liner glides on with extreme ease, making it possible to create all kind of different lines.

The nib of the liner is not overly thin but then it isn’t too thick either. I really like the size of the nib as it allows you to start off with thin lines and build them up if you want to. Using the pen feels very comfortable in my hand and even better if I rest my elbow on my desk while applying the liner to my eye. I find that this makes it possible to have a better hold on the pen and also to not have a shaky hand which will result in uneven lines.

Collection 2000 also claim that this will last through a whole 24 hours. They weren’t lying either. I use this every day and I tend to go to work for a long period of time (sometimes 13 and a half hours). If you take into account the time it takes me to get ready, 30 minutes travel each way to work and the time there, I say this lasts at least 16 hours. I can’t say that I have ever kept it on for the full 24 though but after 16, it still looks as perfect as it did when I put it on in the morning.

As this pen style liner is extremely black and dark, it may not be the right thing for some people. For me though, it is exactly what I want and it gives me the look I like for every day. Collection 2000 products can be found at Boots and Superdrug and this product costs only £2.99, which makes it fantastic value for money. 

Monday, 27 May 2013

Ecotools Tapered Blusher Brush


After leaving all of my make-up on a bus recently, I had to replace everything including the brushes. I haven’t bought new make-up brushes in longer than I would like to say, because I loved what I had so much. My only options for quick shopping was at Boots and unless I wanted their own brand, Ecotools was all they had left due to it being a small branch.

One brush that I bought was the Ecotools Tapered Blusher Brush which cost £7.99. The brush comes in a half plastic and half material pouch which is eco-friendly. The pouch has a cardboard label attached to it although this is easily ripped or cut off. The label explains how this is an eco product and on the back, more about the brush and the eco packaging. The pouch is quite nice and reusable, so you are able to keep your brush in a nice condition should you travel about with it. The back of the pouch has a small push type button which is easily opened and reclosed.

The brush itself is made from eco materials. As Ecotools explains; ‘soft, cruelty-free bristles, has a recycled aluminium ferrule and a sleek bamboo handle.’ As I said before, I am not overly bothered about eco-friendly products and I just wanted a half decent blusher brush. However, this one does look really nice. As I bought other brushes from the same brand, they do all look nice next to each other. Also, I think they look a hell of a lot nicer than cheaper, plastic brushes.

What really matters though is how the brush feels and how well it works. The bristles on this brush are incredibly soft which is always a good start. The bristles feel lovely on my skin and don’t scratch anywhere at all. After sweeping the brush across my blusher a few times, I couldn’t see the colour on the bristles. However, I was sure it had to be there so I began to apply to me cheeks. The colour was there on the brush though so you need to be careful to not be deceived with these. I could have ended up looking like a rosy cheeked clown.

Anyway, the brush is tapered, so it is not rounded. Instead, the bristles are in a shape that helps to apply blusher better, hitting all the right parts of the cheekbone. I didn’t think the shape of the brush mattered too much but now I know differently. Working upwards from your cheekbone to your hairline, applying blusher is definitely easier with this brush. Sometimes with my old brush, I had to blend in quite a bit as it went out too far but not with this one.

Overall, I really am quite impressed with this blusher brush. The only downside is not seeing colour on the bristles but after using a couple of times, you get used to knowing how much blusher you are going to need. 


Thursday, 23 May 2013

Seventeen Miracle Matte Pressed Powder


Recently, I left a bag on a bus which had all of my essential make-up in it. Going away for a few days later that day meant that I had to replace my whole basic make-up kit. Luckily, there is a Boots across from where I work so I was able to go and pick things up quickly. However, in regards to face powder, I have never used it as I have had Avon face pearls for years. As I couldn’t get these, I had to pick a substitute and I came away with Seventeen Miracle Matte Pressed Powder. I didn’t want to spend a lot on something I wasn’t completely sure about so I chose a cheaper brand than I normally would have.

The Seventeen Miracle Matte Pressed Powder costs £3.99 and is only available from Boots shops or online. I did look at other brands before choosing this one but they were all too expensive and I was unsure about what to buy in the first place. This pressed powder is available in three different shades which are natural fair, silky beige and porcelain. I chose for the natural fair as there wasn’t an ivory option. The three options available aren’t enough of a range in my opinion as they certainly don’t suit every skin colour.

The powder comes in a very dark case although I can’t decide whether it is black or navy. On the top of the case there is the name of the product, brand logo and the statement ‘up to 16 hours shine control’. The case is pretty basic looking but it does what it needs to. I liked the fact that it claimed to last 16 hours as I am sometimes on the go from 7am until 10pm so I need something that will last. Once you flip up the lid, inside is a mirror on the inside of the lid and then the pressed powder on the bottom. The powder is initially covered by a plastic disc and underneath that is a soft round cloth to apply to powder with.

Although a cloth/ sponge is supplied, I like to use soft brushes to apply any kind
of make-up so I didn’t use this. The powder came away easily on my powder brush with one short sweep across. As the powder is easy to use, you do not need to use much in one go. I found that one sweep across was enough for half of my face and then again for the other half. Although a cheap powder, this does work really well. The finish on my skin was fantastic and the powder made my face look extremely smooth and healthier looking.

This powder is also oil free so you don’t need to worry too much about your skin looking shiny and greasy. The first time I used this, I applied to my whole face at 10am and it was still looking good at 8pm at night. I would have reapplied though if I were going out again just for a touch up. While I don’t think this can cope with the full 16 hours, it lasts a great amount of time and I wouldn’t mind reapplying once throughout the day.

I am really pleased with this pressed powder and after using face pearls for so many years, I am now converted.

Friday, 3 May 2013

Unexpected haul!

I wasn't actually planning on buying quite so much today. All I wanted was a new handbag suitable for interviews/ to go with my interview clothes. However, I was weak and caved by going into Superdrug, which I know I shouldn't have done in the first place. 

First up is the interview bag which came from Next. I absolutely love the bags from Next and this is generally where I get a new handbag from. This one, there was only one left and screamed buy me. It was only £24 as well which I think is a bargain! Inside is a lovely black and white flower print as well as three different compartments. This is a great thing for me as I can keep make-up/ hair stuff in one, purse and I-pod etc in another and then my Kindle/ a book in the other. This is a really well designed handbag. 


I needed a top coat nail polish due to having nail art drawn on yesterday. I quickly learned that a top coat was definitely needed otherwise the pen comes straight off. I opted for a top coat from MUA as I don't use them much and didn't want to pay loads of money. While walking around the make-up section I also noticed some GOSH products were on sale. I managed to bag the gold and silver crackle effect nail polishes for only £1 each (saving £4.49). I couldn't help myself even though I know I didn't need these. 


And last but not least, something I have been dying to buy for a while now. I can't really justify buying this but I'm calling it a 'finishing university present to myself' so I don't feel as bad. I walked out of Superdrug with a Sleek i-Divine Original Palette. This cost £7.99. Not loads I know, but I have a lot of eyeshadow palettes already. 


So, even though I only needed one thing out of all of this, I am really happy with my purchases! 

Friday, 26 April 2013

The cost of make-up


Last week I did something incredibly stupid. I managed to leave a weekend bag on a bus the day I was due to go away. Although the transport company managed to get it for me, it wasn't on the same day. This meant that along with some of my favourite clothes, I thought I had lost my whole set of basic make-up. Also, going away meant I just could not do without make-up and I ended up having to nip over to Boots on my break at work and get a whole new set. I was not expecting this to cost £75!!! 

I don't think I have ever really thought about how much make-up costs, as I tend to buy one or two bits at a time, replacing something that has run out or treating myself to something new. I can't think of one time in my life where I have had to buy a whole set of make-up in one go. I know when I began to wear make-up, it started as eye shadow and mascara and then the rest all came later. It doesn't seem like a big deal to spend £10 on a mascara now and again, or roughly £9 on a foundation but when you need everything at once, it becomes like hell. 

Not only did I need to buy mascara, foundation, pen eye liner, blusher and powder, I also needed brushes and eyelash curlers. Brushes are crazily expensive I think, and at £10 a go these ended up costing me £30. I only bought the essentials too which was a foundation brush, blusher brush and powder brush. I can't imagine what I would have ended up spending if I was a regular wearer or eye shadow and lipstick. 

I do obviously own more make-up than the basics but I just wanted enough to get me through a weekend. Also, as I'm moving out of my university flat pretty soon, I've already sent a lot of my make-up back home so I didn't have the option of using any of my other supplies. 

I am going to Florida in September and was planning on stocking up a little bit as the prices are so much more reasonable than they are here for make-up. Now though, I think I'll be spending a little more than planned. It would be nice to have an extra set of most things always available just in case I do something like this again. 

Monday, 1 April 2013

QVS Foundation Brush


I have only ever had one kind of foundation brush and that is a QVS foundation brush. This was the first one I ever bought and because I have been so happy with it, I have stuck with it ever since.

QVS is a brand that creates a range of different make up brushes and are sold online and in store at Superdrug. When I was looking for my first brush, everything I came across was really quite expensive and I didn’t want to pay too much when I was unsure of whether I would get on with it or not. At the time of purchase, I paid about £4 although they are now £4.99. Even at the cost of an extra pound, when I need a new one, I will definitely be buying one of these again.

My biggest problem with this brush (and it isn’t even a big one) is the packaging. The brush comes in a plastic packet which has nowhere or no instructions for how to get the packet open. Because of this, you have to cut into the plastic with quite strong scissors. Do not use really cheap or thin ones as they might break – I have had this problem many times when opening packets for headphones. I understand that this type of packaging is probably used to deter shoplifters but when you pay for a product, you do expect to at least be able to get at it.

The brush inside the packet has a navy blue handle with a small QVS logo towards where the brush is. The handle is sleek and comfortable to hold and is made from plastic. Just above that is a smaller metal part of the handle which holds the brush bristles in place and then obviously, the brush is at the top. The bristles themselves are extremely soft and much nicer than I was expecting them to feel due to the price I paid for the brush. The bristles are synthetic and not natural unlike with some other foundation brushes you can buy. However, I don’t think that matters at all because feel is the most important thing and not what it actually is.

To apply your foundation, you can either put it straight onto the brush bit by bit, or on the back of your hand and then using a small amount at a time. The brush does soak up liquid very quickly though. However, you can just press the brush a little more forcefully to your face and you will be able to use some of the excess foundation. Instead of applying foundation to your whole face at once, with a brush you need to cover section by section, making sure it is all blended in. The more you use this brush, the more foundation it will soak up into the bristles but that doesn’t really ever effect that way the brush works on your skin.

To clean the brush, I generally use shampoo and hot water, leaving it to soak for a little while. You can also just use soap and water but I think as you are cleaning bristles, the shampoo makes them a little softer. After washing the brush, it will look and feel like new again. I have been using and washing my brush for well over a year now and it isn’t any worse off than when I bought it. As I’m living between university in Nottingham and my fiancé’s in Norfolk, I actually have two of these now, one in each house, because I liked it so much.

As you can see, I think this is a fantastic product and great value for money.

Monday, 11 March 2013

MUA eyeshadows 1 and 12


As most of my eyeshadows are in the form of big paletts, mostly from Urban Decay, I thought it was about time I treat myself to some singles. With paying for the wedding and still being a student, I don’t exactly have a lot of free cash lying around. However, I have heard so much about budget brand Make Up Academy (MUA) and I figured I should finally give it a go. MUA products are available from Superdrug and prices start from £1. What I ended up buying was four different singular eyeshadows, all costing £1 each. (Shades 1, 2, 11 and 12)

MUA eyeshadows come in small round plastic pots. The bottom half is black plastic while the top is clear plastic. The lid, which flips up, has on it the MUA logo, the full Make Up Academy name and it also states that this is an eyeshadow. If you flip the pot over, the bottom shows the product information and ingredients as well as the number of the eyeshadow. For some reason, I really dislike round packaging. I think mostly because if I want to put products in a box, they don’t fit neatly. However, the packaging isn’t that big of a deal and for £1, who really cares.

Anyway, my first uses of MUA was shades 2 and 12, which are a silvery cream colour and a grey/ brown. I bought shades which complimented each other so I could mix them together. I also decided to not use a primer with these as I wanted to see how they lasted on their own.  The eyeshadows themselves are soft to touch if you use your fingers which instantly made me think that they would feel nice on my eyelids. When using a brush to apply this eyeshadow takes a fair bit of work which was unfortunate. I used both a light and dark colour and with each one, I had to go over the colour a lot with my brush to get enough on it to put it on my eyelids. Maybe this was because they’re new though as they have gotten better as I have used them more.


MUA eyeshadows are easy to apply. When brushing the colour over my lids, I found that even though I had quite a lot on the brush, there wasn’t much excess falling off and onto my face. With the darker one, there was a little bit but it wiped away very easily. The colours also mix really well together and even putting one right on top of the other didn’t make my eyes look like I had far too much make up on. However, without a primer, these eyeshadows didn’t last all day but again, they were only £1. They still lasted a good few hours without beginning to wear off though so I was happy with how they did.


At the price, I definitely can’t complain about MUA eyeshadows and will be buying more in the future. 

Thursday, 7 March 2013

Urban Decay Primer Potion


Urban Decay Primer Potion is something that I swear by. I have both the Book of Shadows 1 and 2 and they both came with a primer potion (sample size) inside. I had previously never used anything like this before but I have always ended up with creased eye shadow by the end of the day, even using Urban Decay ones.
Primer potion comes in a small purple container (purple is Urban Decay's signature colour) which is quite strangly shaped because it has quite a few curves. The applicator wand is one much like an eye shadow basic applicator or lip gloss wand. The potion itself is a neutral colour so if you aren't very precise it wont matter because you wont be able to tell and the consistency is quite thick like foundation. Because the container is purple, you can't actually see inside so knowing how much you have left can be tricky.
To apply, just coat your whole eyelid with the potion and leave to dry for about half a minute or so. I have found that it doesn't really matter how long you wait though as I have put eye shadow on straight after and after about 3 or 4 minutes. The result is still the same. The potion acts like a magnet for eye shadow and makes any power stick for the whole day. Obviously, if you haven't been very precise with the potion, you could end up with eye shadow in weird places that wont look very good.
Even though this product makes eye shadow stay where it should all day long, it is also very easy to remove and wont take any harsh rubbing to get it off. I love how easy it is to put on because I don't really have time to mess around in the mornings (I would much rather have an extra half an hour in bed). I also use this on my lower lashes for a night out when I use brighter coloured eye shadows as eyeliners. Before using this, I found that the eye shadow had worn off after a couple of hours but now it is still there when I get home.
The two sample sized potions that I got with my boxes have lasted me a long time and because of this, I wouldn't hesitate in paying the £11.50 for a full sized version. I know this sounds expensive but it would save you money in the long run when you have to reapply or sort out your eye shadow at different times of the day.
Primer potion is by far my favourite product from Urban Decay and I would never be without it now. Although I mainly use Urban Decay eye shadows, I have tested this product with other brands and it still works just as well.
Urban Decay is available in Debenhams, Boots and House of Frasier and some products from Amazon.

Thursday, 21 February 2013

Collection 2000 Pump Up The Volume Mascara


I’ve been using the Maybelline Cat Eyes mascara for quite some time now and as mine was running out, I decided it was time for a change. When looking around in Boots, I found the Collection 2000 Pump Up The Volume Mascara on offer for £3.99 which actually only had £1 off. Still, I didn’t want to buy something really expensive and figured that this was worth a shot.

Collection 2000 claim that this mascara ‘delivers up to 12x more volume to give the impression of false lashes without the fiddling. Intensely volumising mascara for bold, fanned out lashes. The Unique curved brush holds extra product for maximum coverage’

The mascara comes in a black and yellow mascara tube, which has a screw top lid. The top of the lid has a bit that is clear although I have no idea why, The packaging is bright and stands out on the shelf, which is partly why I was drawn to it. The front of the tube has the Collection 2000 brand name and the name of the mascara. The back of the tube has the product information, such as a description of what it does and the barcode.

This mascara is available in three colours: black, ultra black and waterproof black. I chose the ultra black because my eyelashes are so light normally. Another reason why I chose this mascara is because I could see by a display that it had a traditional type of brush. By that I mean it isn’t one of these new, horrible plastic brushes. I just don’t get along with them. When you unscrew the lid and pull out the mascara wand, you’ll be able to see the big, thick brush at the top. This is a much thicker brush than I am used to using and it took me a while to get used to it without getting black all over my eyelid.

Just the Mascara
I do use eyelash curlers before putting on mascara so this should be noted when talking about the results. After curling my eyelashes, they were very curled before putting on the mascara. As I said before, the brush is extremely thick and there is a lot of product on it when you pull it out of the tube. As I applied the mascara to my eyelashes, I could see them drop quite quickly. Although the mascara is extremely black, it is also very thick and maybe this weighed my lashes down compared to other mascaras. Although my eyelashes did stay more curled than without curlers or mascara, they definitely did not look like falsies.

With a bit of eyeliner
I’ve been using this mascara for a while now in the hopes that maybe I just get more used to it but so far, this hasn’t happened really. The mascara still goes on extremely thick and while it doesn’t clump, it doesn’t do what it says it will either. I can’t see that this mascara does anything other than make my lashes a lot darker as it certainly doesn’t volumise them by much. Even though this was a cheap mascara, I was still expecting better. I know that from now on I won’t be trying anything cheap again because my lashes are just too straight to risk it! 

Monday, 31 December 2012

Rimmel Lasting Finish 25 Hour Foundation


As I am a student living in Nottingham and I also live with my boyfriend in Norfolk, I have two sets of make up so that I don’t have to cart it around everywhere. For some reason, some of the items in both collections are different and one thing I have at my boyfriend’s is the Rimmel Lasting Finish 25 Hour Foundation.
Foundation is one of those staple make up products that I just can’t live without. Although I do have pretty good skin, I don’t like how it looks without having foundation on. I also do really long days at work so I wanted something that would last for my whole shift without coming off half way through. This is mainly the reason why I bought Rimmel Lasting Finish 25 Hour Foundation. With the promise of lasting 25 hours, I was sure that it would be a good foundation that would last a good amount of time.
Rimmel is a well-known cosmetics brand now and can be found in shops like Superdrug, Boots and most supermarkets too. This foundation was bought from Superdrug and cost £6.99 although it is sometimes on offer either on its own or when you buy other Rimmel products. £6.99 is an average price for a foundation so I didn’t think it was overpriced at all and I was quite happy to pay this.
The colour of foundation I chose was True Ivory which is colour number 103. The foundation claims to be heat, humidity and transfer proof which I guess is what would make it last so long. The colour inside the glass bottle was much like any other ivory coloured foundation I have bought in the past and once on my face, it suited my skin colour perfectly. The foundation is creamy and thick but didn’t need much working in before my skin looked smooth and more even.
While the foundation colour did suit my skin really well, it unfortunately does not last 25 hours. Our phone at work ended up being covered in a foundation coloured powder after using it quite a few times throughout the day. Luckily, I did not experience the foundation coming off on my clothes or hands though. The foundation did last through an 8 hour shift at work, even with some of it coming off on the phone although it didn’t last too much longer than that. There is no way that this foundation will last the 25 hours it says it will, unless you put it on, sit in the same spot for 25 hours and not move at all.
Although this doesn’t do what it claims to do, this is a good foundation and I would still probably buy it again due to it suiting my skin so well.